
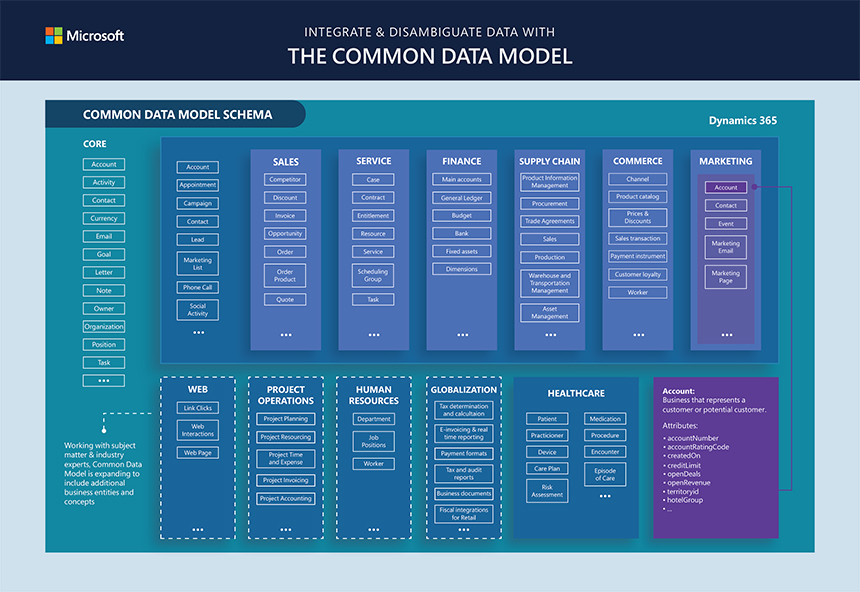
Introduction
When it comes to storing, sharing, and managing business data and digital assets, SharePoint Online is one of the most efficient, easiest, and quickest ways to go about it. Gone are the days when businesses manage files via clunky legacy systems that hinder them from reaching maximum productivity potential. Microsoft SharePoint Online has brought a new dawn of improved data management and productivity which runs on the cloud- and web-based technologies.
That said, if you’ve been searching for how to migrate your data to SharePoint Online, you might have noticed that there are two common options: manual dragging and dropping or purchasing a third-party migration tool. The manual option works only for moving small data, while you had to purchase a moving tool for large data. However, the story has changed with the launch of “The Microsoft SharePoint Migration Tool.”
The Microsoft SharePoint Migration Tool is a free tool that enables businesses to move large files and documents to SharePoint Online quickly and efficiently. So if you’re looking to move your large data to SharePoint Online, follow these 7 simple to complete your migration.
Step – 1: Always Analyse The Content On The Source System
Migrating without analyzing and sorting your data will leave you transferring junk and disorganized files to your new data management system. Sorting your files helps you define the right migration rules for you and keeps your SharePoint Online data as tidy as possible.
- Some essential data to know when analyzing your content include:
- File formats and volume
- The categories and extensions of your files
- File and folder activity
- Metadata keywords and usage
Step – 2: Determine The Data Structure in Your New SharePoint System
Once you’re done analyzing your content, it’s time to move to SharePoint to determine your data structure. SharePoint allows you to structure your data from general to specific, which makes it easy to remember, use, and share. You can organize your data in web applications, sites and subsites, site collections, lists/libraries, and folders.
Step – 3: Define Global Data Model in SharePoint
Then we advance to defining a new metadata model which relies on your decision in step 1. In this phase, you will generally compare your source system’s data model with your target system’s model and subsequently merge the data models to a single global data model, which helps you cover all data. Plus, having global metadata enhances the quality and findability of your SharePoint Online content.
Step – 4: Classify All Content According To The New Metadata Model
One final step that can help to boost your content’s findability before proceeding to the actual transfer is to add metadata tags that help to classify your data. If you’re handling a large volume of data, you may consider using a content classifying tool to automatically classify the data from your source system easily.
Step – 5: Transfer Your Data Into SharePoint
Completed all the steps above? Excellent! Now you have well-organized and structured data and are ready to transfer your data into SharePoint Online. Your cleaned-up house makes data management in SharePoint Online a breeze, and your productivity will most certainly improve significantly.
Step – 6: Download & Install the Microsoft SharePoint Migration Tool
• Click on Office 365 App Launcher > Admin

• Navigate to SharePoint Admin Center

• Under Migration, click on Desktop tool (SPMT) (SPMT = SharePoint Migration Tool)

• Click the Download tool button to download the software

• Once downloaded, install Microsoft SharePoint Migration Tool on your computer by clicking on the downloaded file
• Next, you will need to log in to the tool using your Office 365 credentials

Step – 7: Perform Your First Migration
Using Microsoft Migration Tool is as simple as ABC, which is why I love the tool. You literally do not need any special skills, technical knowledge, or high IQ to use it. I’d walk you through the process of migrating file shares to SharePoint Online with the help of the Microsoft SharePoint Migration Tool.
• Click on Start your first migration button

• A box will pop up with options that allow you to easily choose your source files, whether it’s from your local computer or a network file share. Individuals who are already on the old SharePoint can migrate to SharePoint Online by clicking on SharePoint Server. Since we’re considering migrating from files share to SharePoint Online, we will select FileShare.

• Next up, select the source of your files, i.e., the actual folder you desire to migrate. The folder can be on your C: Drive or on a network drive. Once you’re done, click Next to proceed.

• Paste the URL of the SharePoint site you want to migrate to on the empty box on the next screen
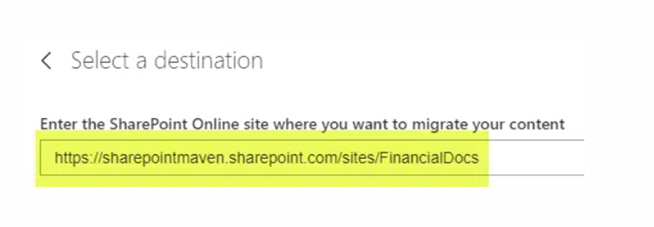
• It’s important to note that when pasting the URL, you should only paste the URL of the site and not a page of the site. For instance, if you paste a page URL such as “https://sharepointmaven.sharepoint.com/sites/FinancialDocs/SitePages/Home.aspx,” it will return an error: “The site does not exist. Please create the site first before continuing the migration.” This is because you pasted the URL of a page instead of the main site. You need to remove the SitePages/Home.aspx at the end of the URL and paste only “https://sharepointmaven.sharepoint.com/sites/FinancialDocs/.”

• If you input the correct URL, you will immediately get a list of all document libraries existing on the site. You can then choose the library you desire to migrate to

• Click Next

• On the next screen, you can give your migration a name and click Next

• Once you’ve completed all the above steps, hit the “Migrate” button to start migrating. Accept all default settings if you’re doing basic migration, but you can alter some advanced settings by clicking “View all settings.”

• You will now see the progress of the migration live on your screen

• When migration completes, you will get a confirmation message

• Click on the save button to save the message, as you will need it to perform incremental migrations later, and you can view the detailed migration reports when you click “View reports.”

• When all processes are completed, your migrated files will appear on a site (document library) like the image above. You will observe that Modified Date metadata is preserved by the migration tool and does not default to today’s date (migration date), which isn’t the case if you were to migrate manually by dragging and dropping the files. Another thing to note is the System Account which appears under Modified By instead of your name (and that’s excellent!)

Conclusion
Voila! Now you’re ready to start enjoying all the benefits of managing your business data via SharePoint Online. Effortlessly integrate with the Microsoft Office Suite, including Microsoft Excel, PowerPoint, Word, Unified Communications, Exchange Server, etc., and drive your business to optimal performance.
Written By – Adam Pittman